If you've tried to use the AutoCompleteExtender inside a ModalPopupExtender, you'll notice that the autocomplete options show behind the modal popup. This is a Z-index problem in which the ModalPopupExtender overrides all other controls. If you check the modal's Z-index you'll see that it uses 100001 for its foreground element, so use something higher like 10000001.
<cc1:AutoCompleteExtender ID="ace" runat="server" OnClientShown="ShowOptions">
</cc1:AutoCompleteExtender>
<script language="javascript" type="text/javascript">
function ShowOptions(control, args) {
control._completionListElement.style.zIndex = 10000001;
}
</script>
So we use the OnClientShown property which will call a javascript function to change the AutoCompleteExtender's Z-index when it kicks in.
Thursday, March 4, 2010

Monday, March 1, 2010
SQL Select Into & Insert Into Select
Here are two useful T-SQL query syntax for inserting select statements into tables:
SELECT INTO
SELECT table1.column1, table1.column2, table1.column3
INTO new_table
FROM table1
INSERT INTO SELECT
INSERT INTO table1
SELECT table2.column1, table2.column2, table2.column3
FROM table2
Both of these syntax inserts query results into a table, the only difference is that we use SELECT INTO to insert values from an existing table to a new one (a new table that is not yet present in the database).
And we use INSERT INTO SELECT to insert values from an existing table to another existing one. Of course be reminded that the number of select columns from the source table should match the destination table's columns. Also note that if you use SELECT INTO to copy values from an existing table to another one, you'll get an error like this: Msg 2714, Level 16, State 6 - There is already an object named 'table_name' in the database. So you really should use INSERT INTO SELECT in those cases.
SELECT INTO
SELECT table1.column1, table1.column2, table1.column3
INTO new_table
FROM table1
INSERT INTO SELECT
INSERT INTO table1
SELECT table2.column1, table2.column2, table2.column3
FROM table2
Both of these syntax inserts query results into a table, the only difference is that we use SELECT INTO to insert values from an existing table to a new one (a new table that is not yet present in the database).
And we use INSERT INTO SELECT to insert values from an existing table to another existing one. Of course be reminded that the number of select columns from the source table should match the destination table's columns. Also note that if you use SELECT INTO to copy values from an existing table to another one, you'll get an error like this: Msg 2714, Level 16, State 6 - There is already an object named 'table_name' in the database. So you really should use INSERT INTO SELECT in those cases.
Thursday, February 25, 2010
ASP.NET C# OnEnter event in TextBox
Here is a workaround for ASP.NET C# if you want an event that triggers on pressing the "Enter" key on your keyboard while still inside a textbox.
First the javascript snippet:
if (event.which || event.keyCode) {
if ((event.which == 13) || (event.keyCode == 13)) {
document.getElementById('btnClick').click();
return false;
}
}
else {
return true;
};
It just captures the "Enter" key press (which is 13) and then clicks the corresponding button to trigger its event. So you just place this script on the textbox's onkeydown attribute which I'll show in just a sec.
protected void Page_Load(object sender, EventArgs e)
{
if (!IsPostBack)
{
txtBox.Attributes.Add("onkeydown", "if(event.which || event.keyCode){if ((event.which == 13) || (event.keyCode == 13)) {document.getElementById('" + btnClick.UniqueID + "').click();return false;}} else {return true}; ");
}
}
Just add the attribute on the Page_Load event and you're done.
Check this link for more keycodes: http://www.cambiaresearch.com/c4/702b8cd1-e5b0-42e6-83ac-25f0306e3e25/Javascript-Char-Codes-Key-Codes.aspx
-k
First the javascript snippet:
if (event.which || event.keyCode) {
if ((event.which == 13) || (event.keyCode == 13)) {
document.getElementById('btnClick').click();
return false;
}
}
else {
return true;
};
It just captures the "Enter" key press (which is 13) and then clicks the corresponding button to trigger its event. So you just place this script on the textbox's onkeydown attribute which I'll show in just a sec.
protected void Page_Load(object sender, EventArgs e)
{
if (!IsPostBack)
{
txtBox.Attributes.Add("onkeydown", "if(event.which || event.keyCode){if ((event.which == 13) || (event.keyCode == 13)) {document.getElementById('" + btnClick.UniqueID + "').click();return false;}} else {return true}; ");
}
}
Just add the attribute on the Page_Load event and you're done.
Check this link for more keycodes: http://www.cambiaresearch.com/c4/702b8cd1-e5b0-42e6-83ac-25f0306e3e25/Javascript-Char-Codes-Key-Codes.aspx
-k
ASP.NET C# : Working With Cookies
If enabled on client browsers, cookies are a great way to store bits of data for use by websites like remembering the login state of users who doesn't want to retype their username and password everytime they visit the site.
Here are the most common functions you can use to manipulate cookies in ASP.NET (C#):
SETCOOKIE
public void SetCookie(string name, string value, int expiration)
{
HttpCookie cookie;
if (Request.Cookies[name] == null) cookie = new HttpCookie(name);
else cookie = Request.Cookies[name];
cookie.Value = value;
cookie.Expires = DateTime.Now.AddDays(expiration);
Response.Cookies.Add(cookie);
}
SetCookie can be used to add a new cookie or overwrite an exisiting one in your cookie collection. Simply pass the name and value pair and the expiration (in days) for how long you want that cookie to be in use by your website. In the following code, we store the username "abby" in our collection for 1 day.
SetCookie("username", "abby", 1);
Take note though that if you use the same cookie name "username" again to set another value, it will overwrite the previous one.
GETCOOKIE
public string GetCookie(string name)
{
HttpCookie cookie = Request.Cookies[name];
if (cookie == null) return "";
else return cookie.Value;
}
GetCookie can be used to retrieve the value of the cookie by passing the name. In the following code, we get the value of the cookie considering it has not yet expired.
string str = GetCookie("username");
DELETECOOKIE
public void DeleteCookie(string name)
{
HttpCookie cookie;
if (Request.Cookies[name] == null) return;
else cookie = Request.Cookies[name];
cookie.Expires = DateTime.Now.AddDays(-1);
Response.Cookies.Add(cookie);
}
DeleteCookie can be used to delete a particular cookie from the cookie collection by passing the name. Notice the -1 in the AddDays? That will simply delete the value in the physical cookie file. In the following code, we delete the "username" cookie.
DeleteCookie("username");
CLEARCOOKIES
public void ClearCookies()
{
int cookieCount = Request.Cookies.Count;
for (int i = 0; i < cookieCount; i++)
{
HttpCookie cookie = Request.Cookies[i];
cookie.Expires = DateTime.Now.AddDays(-1);
Response.Cookies.Add(cookie);
}
}
ClearCookies can be used to delete all cookies in the cookie collection. We also used the -1 in the AddDays here but used a loop to delete each one in the collection. In the following code, it will delete the physical cookie file of your website.
ClearCookies();
And that's it for cookies.
-k
Here are the most common functions you can use to manipulate cookies in ASP.NET (C#):
SETCOOKIE
public void SetCookie(string name, string value, int expiration)
{
HttpCookie cookie;
if (Request.Cookies[name] == null) cookie = new HttpCookie(name);
else cookie = Request.Cookies[name];
cookie.Value = value;
cookie.Expires = DateTime.Now.AddDays(expiration);
Response.Cookies.Add(cookie);
}
SetCookie can be used to add a new cookie or overwrite an exisiting one in your cookie collection. Simply pass the name and value pair and the expiration (in days) for how long you want that cookie to be in use by your website. In the following code, we store the username "abby" in our collection for 1 day.
SetCookie("username", "abby", 1);
Take note though that if you use the same cookie name "username" again to set another value, it will overwrite the previous one.
GETCOOKIE
public string GetCookie(string name)
{
HttpCookie cookie = Request.Cookies[name];
if (cookie == null) return "";
else return cookie.Value;
}
GetCookie can be used to retrieve the value of the cookie by passing the name. In the following code, we get the value of the cookie considering it has not yet expired.
string str = GetCookie("username");
DELETECOOKIE
public void DeleteCookie(string name)
{
HttpCookie cookie;
if (Request.Cookies[name] == null) return;
else cookie = Request.Cookies[name];
cookie.Expires = DateTime.Now.AddDays(-1);
Response.Cookies.Add(cookie);
}
DeleteCookie can be used to delete a particular cookie from the cookie collection by passing the name. Notice the -1 in the AddDays? That will simply delete the value in the physical cookie file. In the following code, we delete the "username" cookie.
DeleteCookie("username");
CLEARCOOKIES
public void ClearCookies()
{
int cookieCount = Request.Cookies.Count;
for (int i = 0; i < cookieCount; i++)
{
HttpCookie cookie = Request.Cookies[i];
cookie.Expires = DateTime.Now.AddDays(-1);
Response.Cookies.Add(cookie);
}
}
ClearCookies can be used to delete all cookies in the cookie collection. We also used the -1 in the AddDays here but used a loop to delete each one in the collection. In the following code, it will delete the physical cookie file of your website.
ClearCookies();
And that's it for cookies.
-k
Saturday, February 13, 2010
IIS7 Publish Problems with Database
So after testing your website on Visual Studio and made sure everything is working fine, especially database connections, you now published your new site on IIS7 and to your surprise connections don't work as you've set. Try these following steps..
Open IIS by going to Control Panel > Administrative Tools > Internet Information Services (IIS) Manager. On the left menu, click on Application Pools.


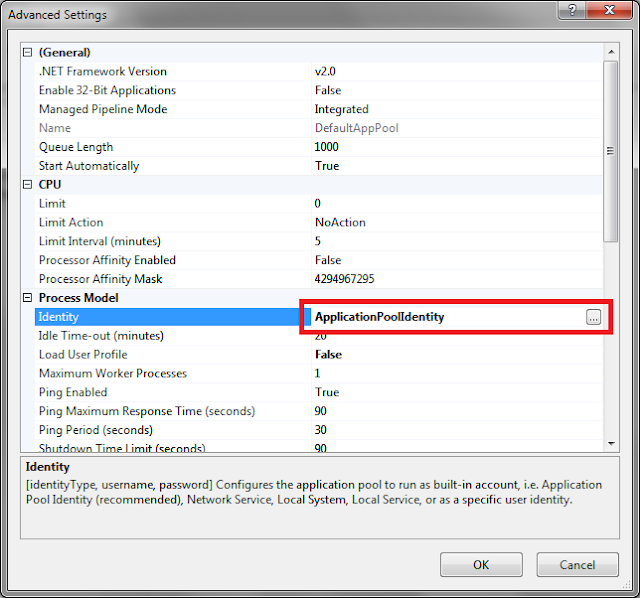
Click on the Identity selector under Process Model.

Open IIS by going to Control Panel > Administrative Tools > Internet Information Services (IIS) Manager. On the left menu, click on Application Pools.

Click on DefaultAppPool and then Advanced Settings...

Click on the Identity selector under Process Model.

Change it to LocalSystem and click Ok.

Now try running your website again and it should have no more connection problems.
-k
Subscribe to:
Posts (Atom)


